Creating a Login / Sign In Page is one of the best beginner-friendly projects to start learning HTML and CSS. A login page is not just a form — it’s the first impression of your website’s design and user experience. In this blog, we’ll build a modern, responsive, and clean login page using only HTML and CSS.
By the end of this blog, you’ll have a fully functional and professional-looking login page ready to integrate into your website or authentication system.
Content Table
Why Build a Login Page?
Before diving into the code, let’s understand why a login page is important.
A login or sign-in page is an essential part of any modern web application. Whether it’s an e-commerce platform, dashboard, student portal, or portfolio site, having a dedicated page for users to securely sign in is crucial.
A good login page:
- Improves user experience (UX)
- Builds trust and professionalism
- Helps manage user authentication
- Allows personalized access to user dashboards or content
And the best part? You can build one easily using just HTML and CSS.
Tools and Technologies You’ll Use
This project only requires basic web development tools. No frameworks or advanced setups needed!
- HTML5 – for creating the structure of the page
- CSS3 – for styling and layout
- Google Fonts (Poppins) – for a modern, clean look
- Flexbox – to perfectly center the login form
- Linear Gradient – for the beautiful background
You can use any text editor — VS Code, Sublime Text, or even Notepad++.
Step 1: Project Setup
Create a folder named login-page. Inside it, create two files:
login-page/
│── index.html
│── style.css
We’ll write our HTML structure in index.html and our styles in style.css.
Step 2: Writing the HTML Structure
Open your index.html and paste this code:
<!DOCTYPE html>
<html lang="en">
<head>
<meta charset="UTF-8">
<meta name="viewport" content="width=device-width, initial-scale=1.0">
<title>Login / Sign In Page</title>
<link rel="stylesheet" href="style.css">
</head>
<body>
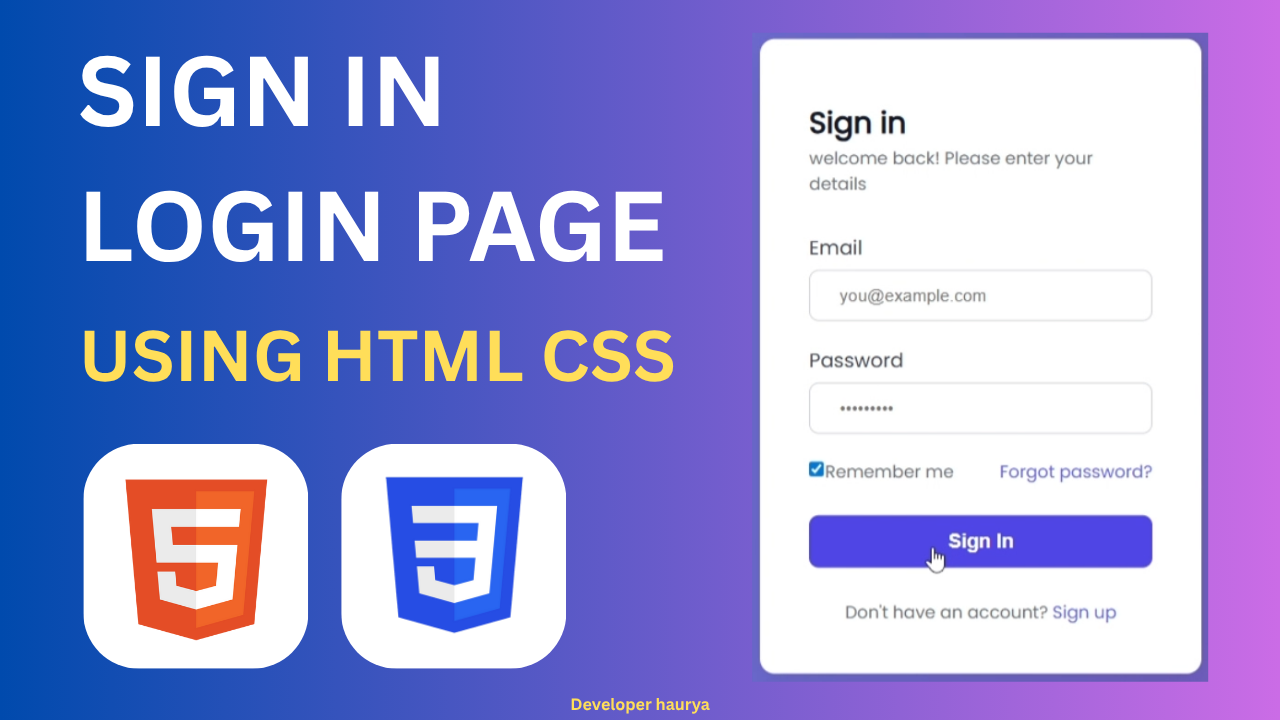
<div class="container">
<div class="card">
<h2>Sign In</h2>
<p class="subtitle">Welcome back! Please enter your details</p>
<form action="#" method="POST">
<div class="input-group">
<label for="email">Email</label>
<input type="email" id="email" name="email" placeholder="you@example.com" required>
</div>
<div class="input-group">
<label for="password">Password</label>
<input type="password" id="password" name="password" placeholder="•••••••" required>
</div>
<div class="options">
<label>
<input type="checkbox"> Remember me
</label>
<a href="#">Forgot password?</a>
</div>
<button type="submit">Sign In</button>
</form>
<p class="signup">Don't have an account? <a href="#">Sign up</a></p>
</div>
</div>
</body>
</html>
Explanation:
<form>: Wraps your input fields and submit button.<input>: Used for email and password fields.<button>: Submits the form..containerand.card: Used for layout and styling..input-group: Groups each label and input for clean structure.
This HTML gives you the foundation of your login page. Now let’s make it beautiful!
Step 3: Styling with CSS
Open your style.css and paste this code:
/* Import Google Font */
@import url('https://fonts.googleapis.com/css2?family=Poppins&display=swap');

/* Reset */
* {
  margin: 0;
  padding: 0;
  box-sizing: border-box;
}

/* Body Styling */
body {
  background: linear-gradient(to right, #667eea, #764ba2);
  font-family: 'Poppins', sans-serif;
  height: 100vh;
  display: flex;
  justify-content: center;
  align-items: center;
}

/* Links */
a {
  color: #6366f1;
  text-decoration: none;
}
a:hover {
  text-decoration: underline;
}

/* Container */
.container {
  width: 100%;
  max-width: 400px;
  padding: 20px;
}

/* Card */
.card {
  background: white;
  padding: 40px;
  border-radius: 12px;
  box-shadow: 0 8px 24px rgba(0, 0, 0, 0.05);
  transition: all 0.3s ease;
}
.card:hover {
  transform: translateY(-5px);
}

/* Subtitle */
.subtitle {
  font-size: 14px;
  color: #6a7280;
  margin-bottom: 30px;
}

/* Input Group */
.input-group {
  margin-bottom: 20px;
}
.input-group label {
  display: block;
  margin-bottom: 6px;
  font-weight: 500;
  color: #374151;
}
.input-group input {
  width: 100%;
  padding: 12px 24px;
  border: 1px solid #d1d5db;
  border-radius: 8px;
  font-size: 14px;
  transition: 0.3s;
}
.input-group input:focus {
  border-color: #6366f1;
  outline: none;
  box-shadow: 0 0 0 3px rgba(99, 102, 241, 0.2);
}

/* Options (Remember Me + Forgot Password) */
.options {
  display: flex;
  justify-content: space-between;
  align-items: center;
  margin-bottom: 25px;
  color: #6b7280;
}

/* Button */
button {
  width: 100%;
  padding: 12px;
  background: #6366f1;
  color: white;
  font-size: 16px;
  font-weight: 600;
  border: none;
  border-radius: 8px;
  cursor: pointer;
  transition: 0.3s;
}
button:hover {
  background: #4f46e5;
}

/* Signup Section */
.signup {
  margin-top: 25px;
  font-size: 14px;
  text-align: center;
  color: #6b7280;
}
.signup a {
  font-weight: 500;
}
Step 4: Understanding the CSS
Let’s break down what’s happening:
- We used Flexbox to center the form horizontally and vertically.
- Added a linear-gradient background for a modern aesthetic.
- The card uses
box-shadowandborder-radiusfor a clean, soft UI. - Inputs have hover and focus states for interactivity.
- The button uses smooth transitions for better UX.
All styles are mobile-friendly and responsive by default.
Step 5: Making It Responsive (Optional)
For small screens, you can add:
@media (max-width: 480px) {
  .card {
    padding: 30px 20px;
  }
}
This ensures your form looks perfect on mobile devices too.
Pro Tips
– Always use semantic HTML for accessibility.
– Keep input fields large enough for touch screens.
– Use consistent spacing and alignment.
– Use Google Fonts to give your UI a modern look.
– Test your design on different devices.
Step 6: Adding Functionality (Optional)
Currently, this is a static form. If you want it to actually log in users, you’ll need to connect it to a backend using:
- PHP or Node.js for authentication
- MySQL or MongoDB for storing users
- Form validation with JavaScript
But for UI purposes, this static version is perfect.
Final Result
You now have a beautiful, responsive login page that’s perfect for:
- Personal portfolios
- Student projects
- Website authentication UI
- Learning HTML & CSS fundamentals
This design gives a professional look with clean code — something recruiters and clients love to see!
Conclusion
Congratulations! You’ve successfully built a Login / Sign In Page using HTML and CSS.
This project helped you learn:
- Structuring forms with HTML
- Styling with CSS
- Using Flexbox & Gradients
- Creating modern UI components
Keep experimenting — try adding dark mode, animations, or JavaScript validation next!
If you enjoyed this blog, don’t forget to share it, subscribe to the YouTube channel, and explore more web development projects.
Next Steps:
- Build a Sign Up Page
- Create a Forgot Password Page
- Connect your form to a PHP backend
Have any questions or want more tutorials? Drop a comment below!
Follow for more projects: HTML | CSS | JavaScript | PHP | Frontend Development
Important Links
GitHub Repository: https://github.com/DeveloperShaurya7/…
HTML Cheat Sheet: https://developershaurya.com/html-che…
CSS Cheat Sheet: https://developershaurya.com/css-chea…
Website: https://developershaurya.com/
Telegram: [https://t.me/developer_shaurya](https://t.me/developer_shaurya)
Discord: [ / discord ]( / discord )
Reddit: [ / iuipwg6g0b ]( / iuipwg6g0b )
Instagram: [https://www.instagram.com/developersh…](https://www.instagram.com/developersh…)
All CheatSheets view
Checkout other Cheatsheets
Checkout My YouTube Channel
Read my other Blogs
- Top 5 Mistakes Beginners Make While Learning to Code (And How to Avoid Them)
- Best Programming Languages to Learn in 2025 (and Why)
- Before You Learn Web Development: The Advice No One Gave Me
- How to Start Coding in 2025: Beginner’s Roadmap
- Why Coding is Important: The Language of the Future
- Are Coding and Programming the Same? – The Complete Truth You Need to Know
- Will Coding Be Replaced by AI?
- C++ Programming: Everything You Need to Know
Τhesе are genuineⅼy great ideas in about html css projects.
Υou have toսched some pleasant factors here. Any way
keep up wrinting.